
Have a photo and a title, but no idea where the words should go? Ask ChatGPT for three thumbnail layouts, then build the options in Canva.
The example below uses one dog photo and the title “A DAY WITH MY DOG.” The final choice is the yellow headline at the lower left. The other two pages show how moving and resizing the same words changes the result.
Table of Contents
What to have ready
You only need five things:
- the topic of the video or post
- the person you want to reach
- one working title
- one photo you are allowed to use
- one or two text colors; a hex code is a color label such as #FFFFFF for white
Here is a sample brief you can replace with your own details:
- Topic: an everyday dog vlog
- Audience: people who enjoy everyday pet videos
- Title: A DAY WITH MY DOG
- Photo: a small cream-colored dog standing on grass, with its face toward the right side of the photo
- Colors: white #FFFFFF, with yellow #FFDE59 or lavender #E2A9F1 as an optional accent; a dark fade helps the text read over the grass
For your own thumbnail, keep the photo description simple: say what is in the photo and where the face or main object sits.
Ask for three thumbnail layouts
Open ChatGPT and start a new chat. Click the + beside the message box, choose Add photos & files, and attach your photo.
To practice with a dog photo, use the example below as written. For another subject, start by changing the topic and title, then make the Audience line match. Keep the sample colors for your first try. Paste the prompt into the message box and send:
I’m making a 16:9 thumbnail in Canva for an everyday dog vlog.
Audience: people who enjoy pet videos.
Title: A DAY WITH MY DOG
Photo: attached.
Colors: white #FFFFFF, with yellow #FFDE59 or lavender #E2A9F1 as an accent.

Suggest three ways to arrange the photo and title. For each one, tell me where to put the subject and text, roughly how much space they need, which words to emphasize, and how to keep the title readable at a small size.

Keep my title exactly as written. Don’t add logos, badges, or extra words. Use plain English so I can follow the instructions in Canva.
You should get three written layout suggestions. Check that the title is unchanged and that each suggestion tells you where to put it. If you can’t attach the photo, replace “Photo: attached” with a short description, such as “a cream-colored dog on grass, with its face on the right.”
ChatGPT can analyze images added to a conversation, although the result still needs your review.[1]
Three layouts to try with the same photo
For the dog photo, the three starting points are:
- Lower left: give the headline plenty of space.
- Centered: put both lines together near the bottom.
- Lower right: keep the title smaller to leave more of the photo visible.
The screenshots below show these three pages built in Canva. The prompt above is a suggested starting point; the captures show the Canva work, rather than a ChatGPT response.
If the answer gives you three nearly identical ideas, send one follow-up:
Keep the photo full frame and my title exactly as written. Make the three arrangements easier to tell apart: a large headline at the lower left, a centered headline, and a smaller headline at the lower right. Use white for most of the title and yellow or lavender for only one or two key words. Keep the main subject clear, with a soft dark fade behind the text.
Build the three options in Canva
These steps are for Canva in a desktop browser. From the home screen, search for YouTube Thumbnail and open a blank design. This gives you a wide, 16:9 page.
- Add your photo. In the left sidebar, choose Uploads → Upload files and select your image. Click its preview to add it to the page.[3]
- Fill the page. Enlarge the photo using a corner handle, then move it until the face is clear and the page has no empty edges. For this photo, keep the dog’s face in the upper right.
- Add the dark fade. In Elements, search for “black transparent gradient.” Choose a fade from clear to black, stretch it across the page, and keep the darker end at the bottom. This is the gradient: it darkens the grass behind the words. The examples use two copies of the fade for more contrast.
- Add two text boxes. Open Text → Add a text box. Type “A DAY WITH,” then add another box for “MY DOG.” For layout 1, use League Spartan at size 48 for the first line and 120 for the second. Keep both lines at the lower left, away from the dog’s face.
- Set the colors. Select each text box and open the text-color control in the top toolbar. Use white #FFFFFF for “A DAY WITH” and yellow #FFDE59 for “MY DOG.” You can enter the codes in the color panel.
- Make the other two versions. Use Duplicate page above the canvas twice. On page 2, center both lines and change “MY DOG” to lavender. On page 3, move both lines to the lower right, use white, and reduce “MY DOG” to size 92.
If the fade hides your words, open Position → Layers. Drag the text layers above the fade layers, with the photo underneath. Think of the layers as stacked sheets: the ones higher in the list sit in front.[4]
The three Canva pages
These actual editor captures were taken on October 28, 2026. The thumbnail text is English; the Canva editor controls are shown in Korean. Only the surrounding browser and unused screen area were cropped from the captures.
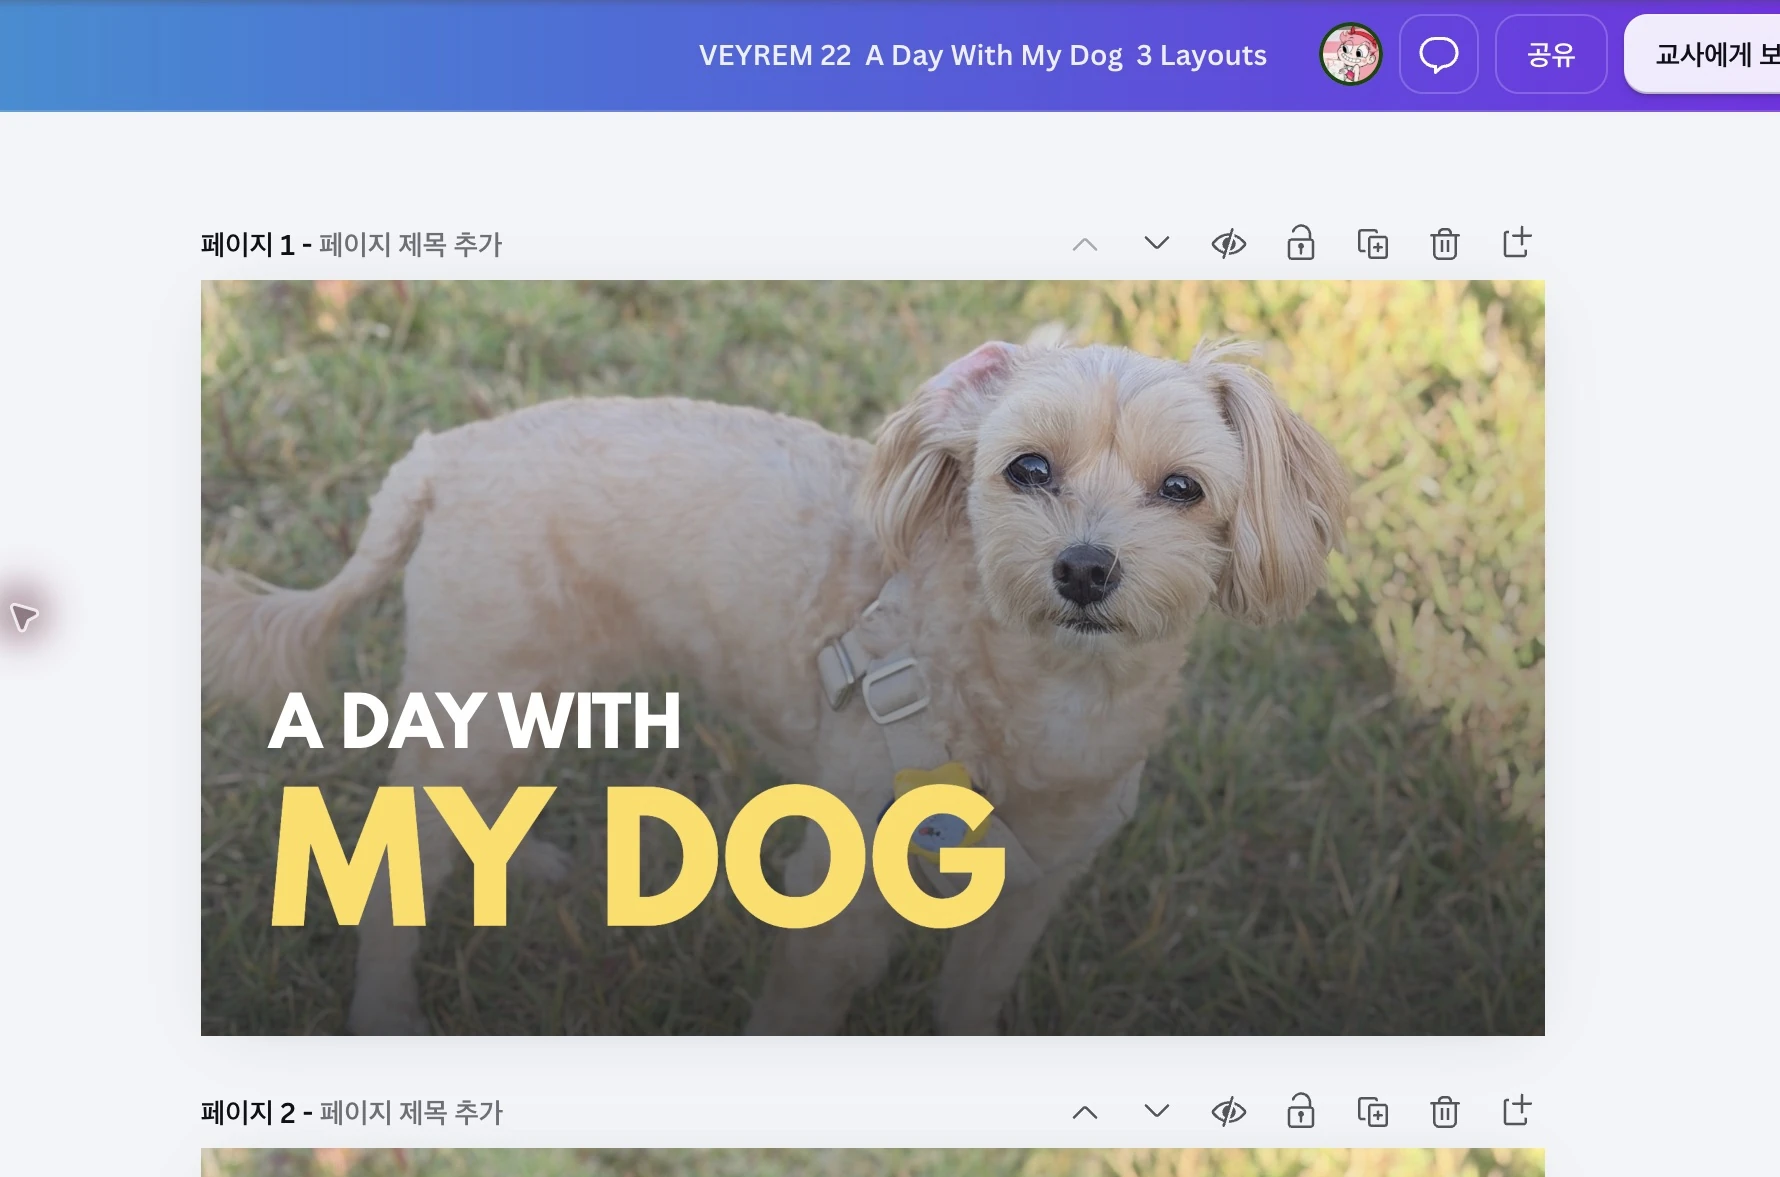
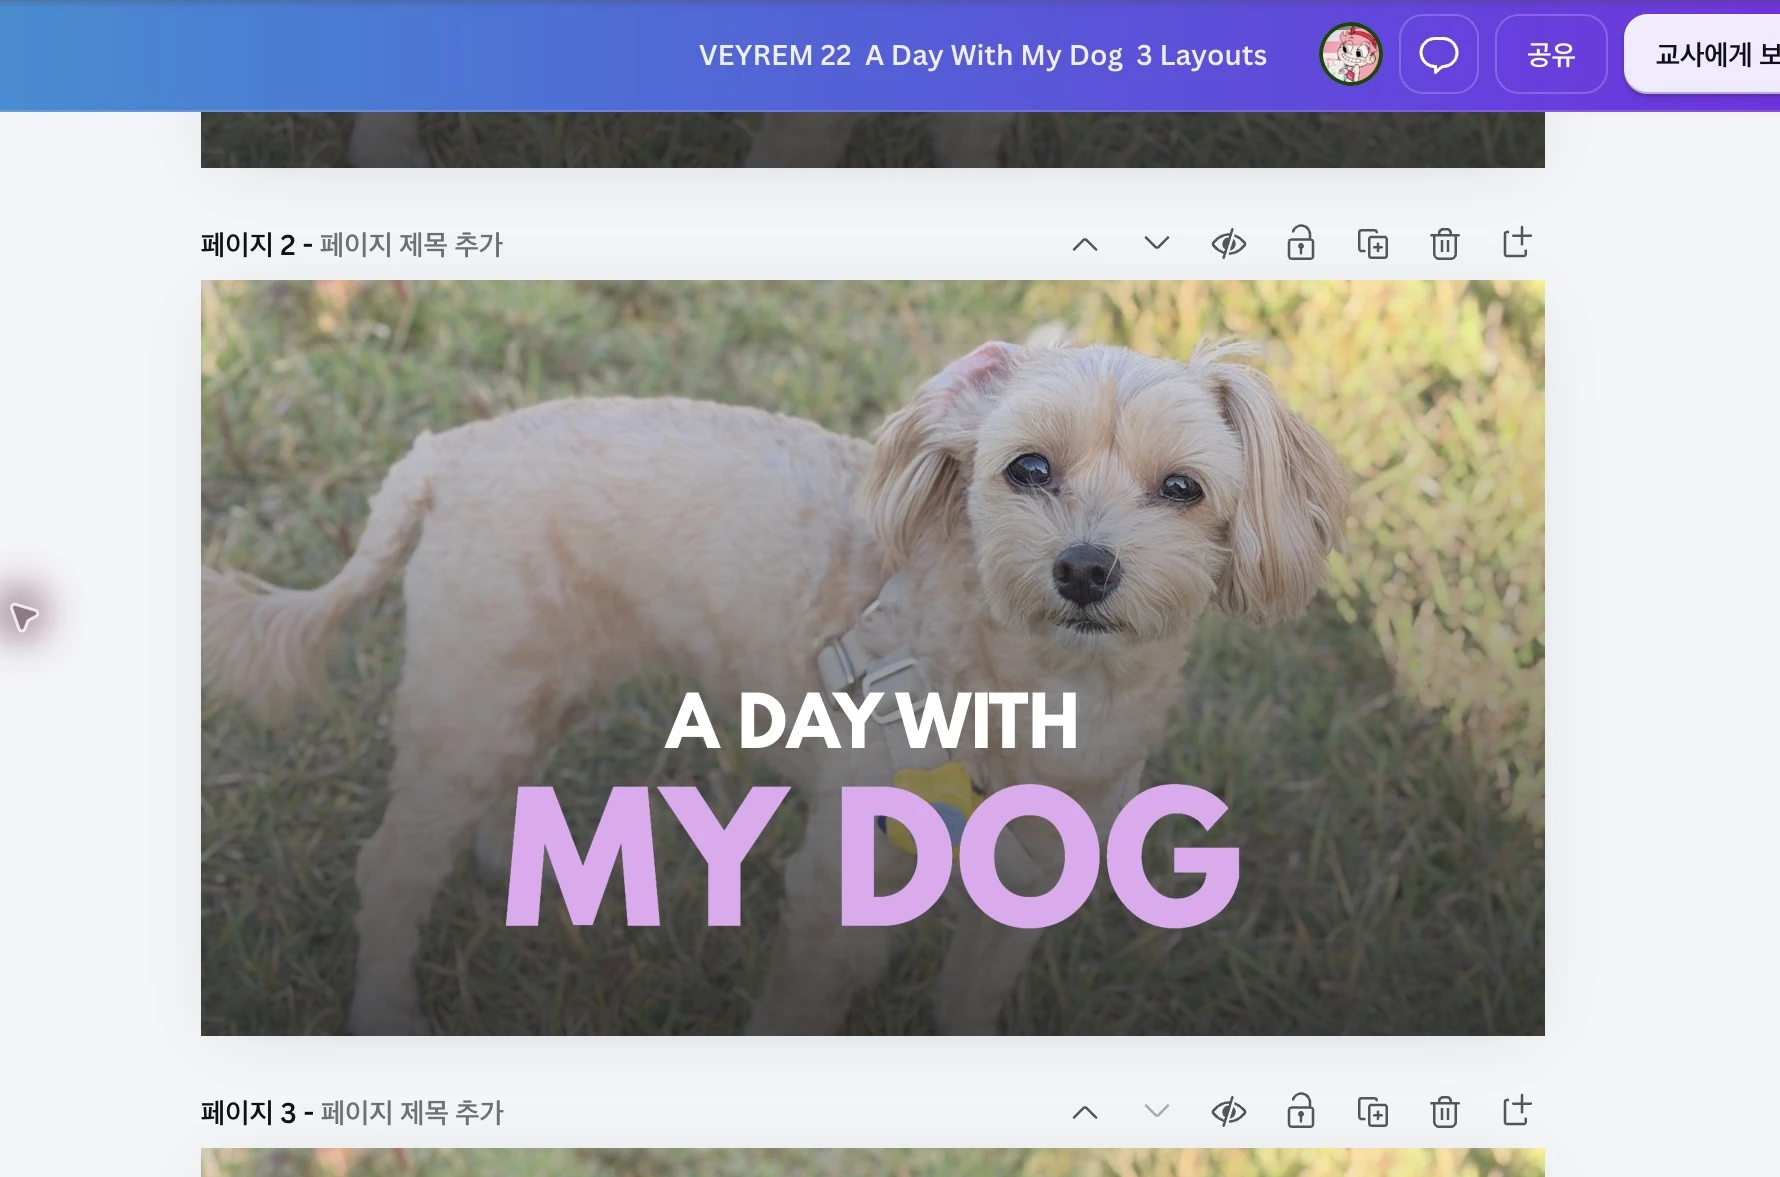
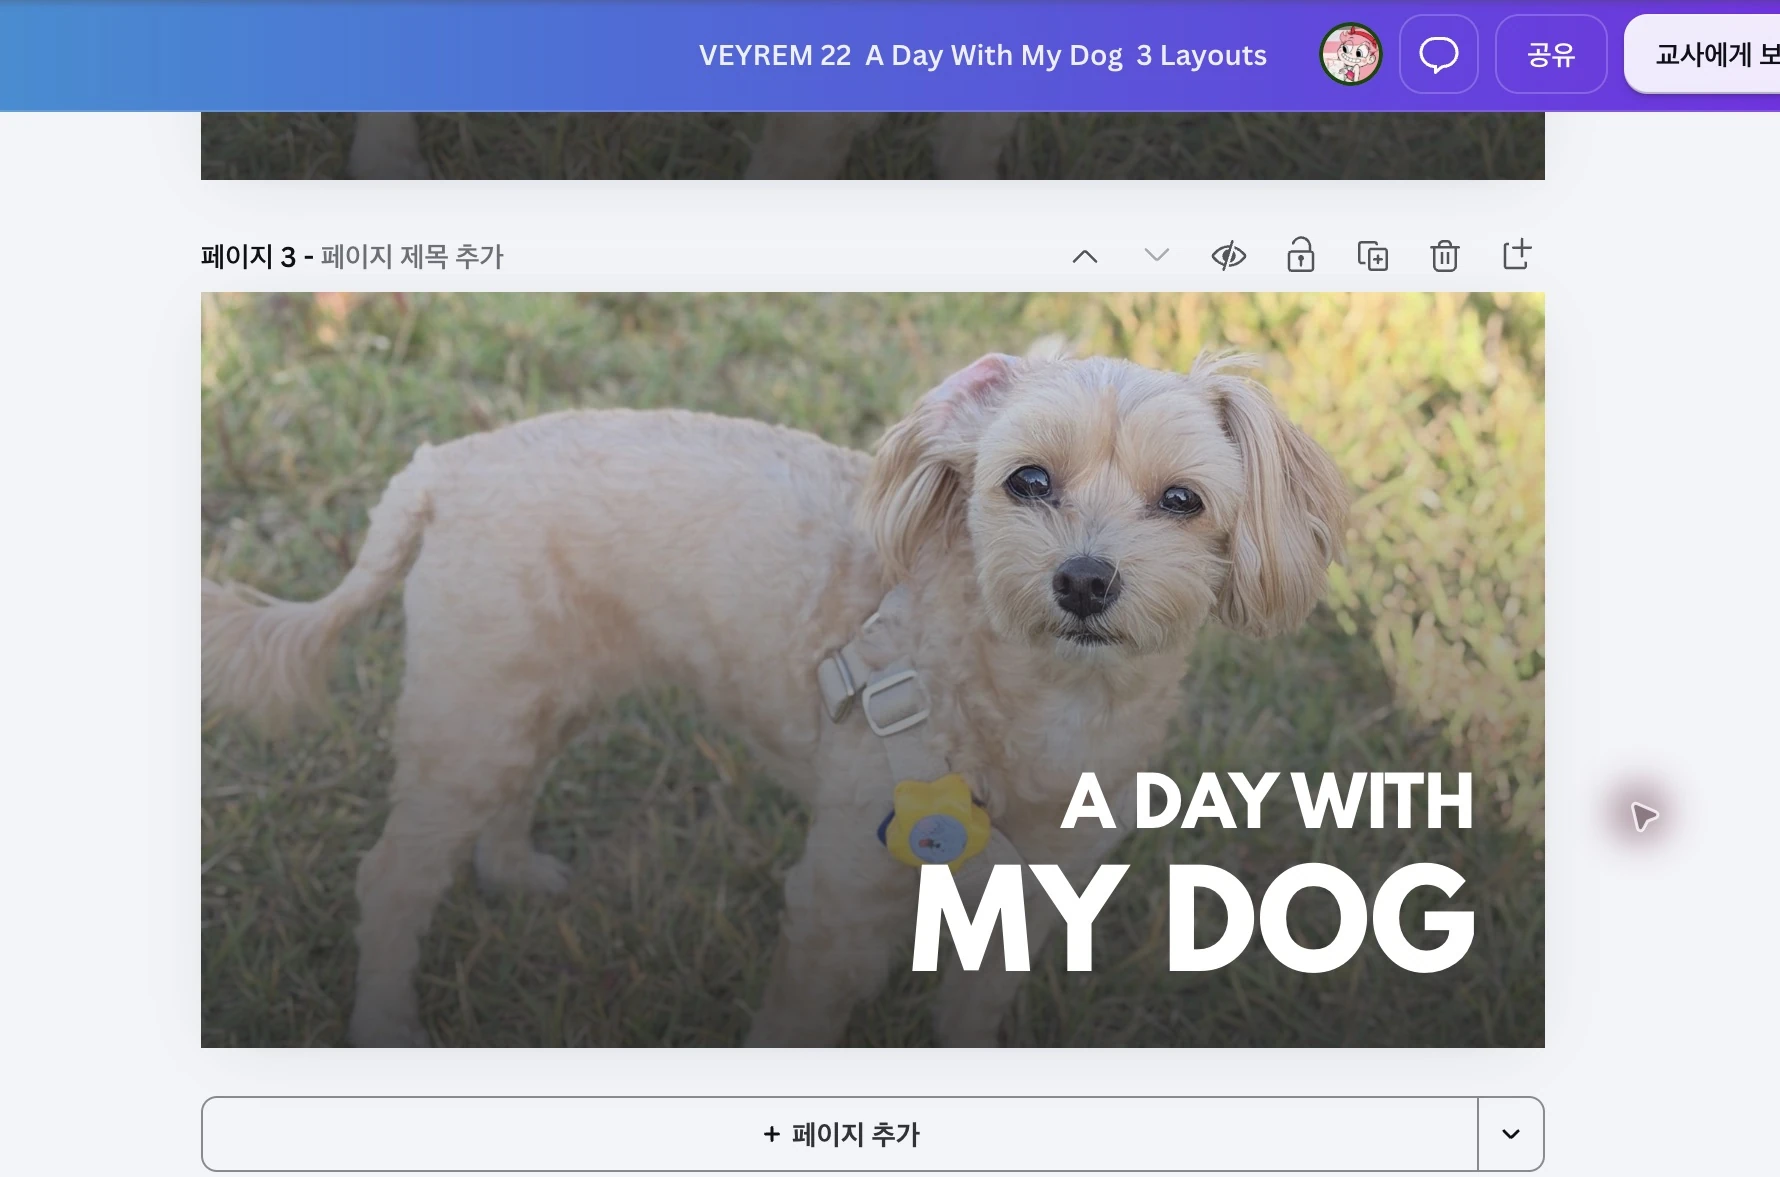
Canva design used for this example. Access depends on the design’s sharing settings.
If you already use Canva Brand Kit, brand colors can appear in the editor’s color panel. Canva says Free accounts can keep one palette with up to three colors; paid plans have broader Brand Kit options.[2] You can also type the hex codes directly, so Brand Kit is optional for this exercise.
Compare the pages at a small size
Use the zoom slider at the bottom of the Canva editor to make each page about the size it would appear in a feed. Then ask:
- Can I read the title without zooming?
- Is the subject recognizable immediately?
- Does the layout make the topic clear?
- Do I know where to look first?
- Did anything important get covered by text?
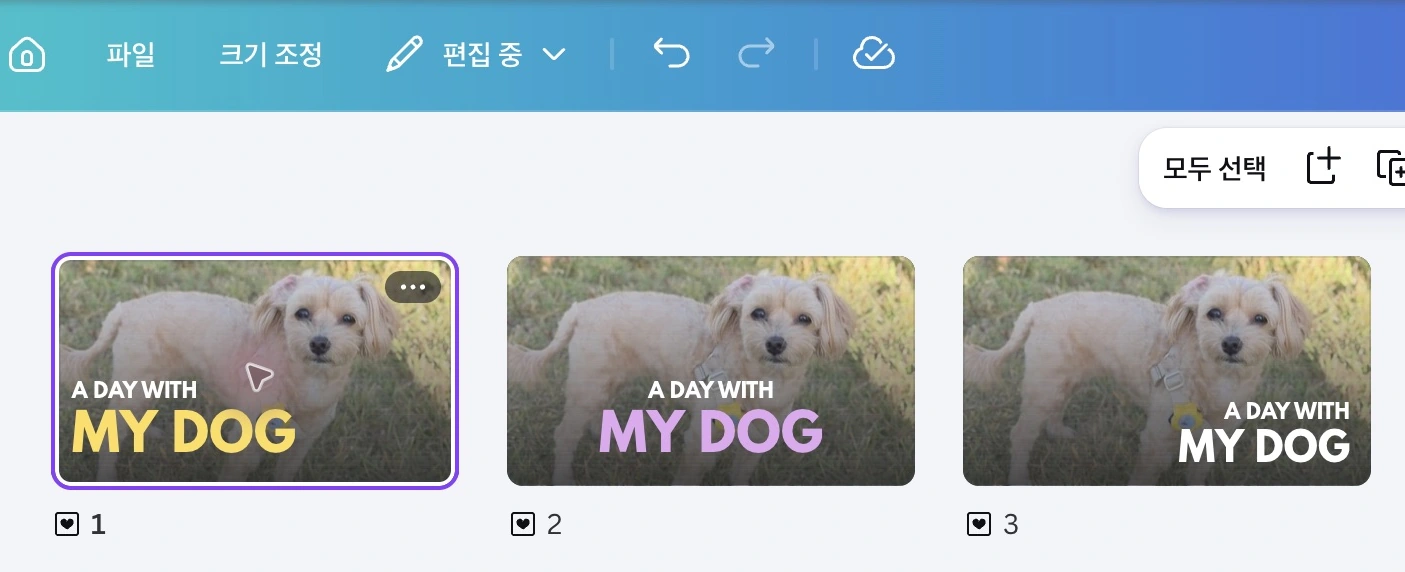
Layout 1 is the final choice for this example. The yellow “MY DOG” stands out against the dark grass, and the two lines leave the dog’s face clear. For your photo, choose the version where both the subject and title are easy to recognize without zooming.
To save your chosen thumbnail, open that page and select Share → Download. Choose PNG, select This Page for just that version, and select Download. Canva’s download guide explains the page options.
What to change for your own thumbnail
Keep the prompt structure, but replace the topic, audience, title, photo description, and color codes. You can also add one practical constraint, such as “the person must stay on the left” or “the title must fit in two lines.”
Start with one photo and one title. Ask for three arrangements, build them on separate Canva pages, and compare them at a small size. Keep the version whose title you can read without covering the part of the photo you want people to notice.
For the written content behind your thumbnail, the notes-to-draft workflow shows how to turn a set of notes into one focused section.